The newly released batch testing functionality offers the following benefits:
More time savings. With the ease of automation, operators just need to focus on loading up cartridges and analyzing reports. The Exponent software and the texture analyzer handle the bulk of the work.
Lower training time per user. Batch testing automates much of the testing process so that operators need less training to learn how to execute tests.
Highly repeatable results with more time for analysis. With time saved with automation, operators can focus on the most important part of the test process—analyzing the data.
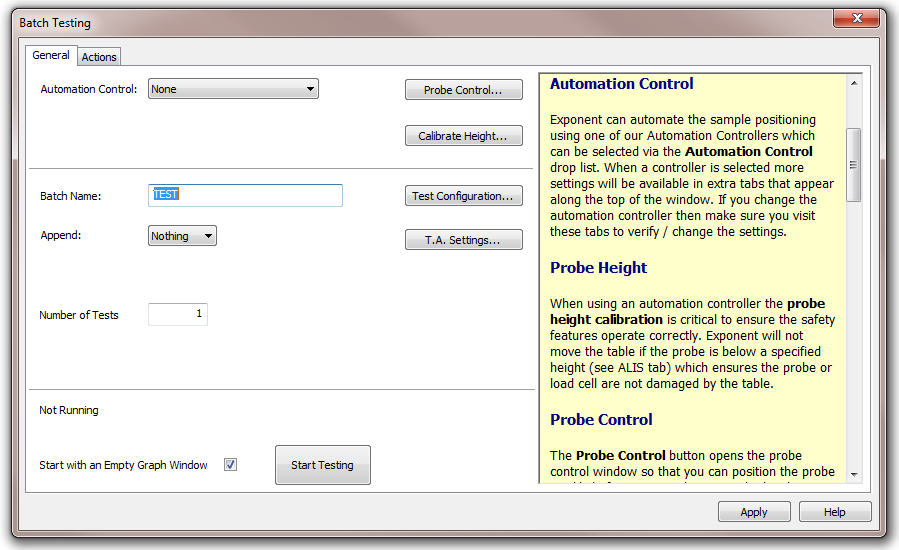
Users access the batch testing tab in the Exponent software. Using this tab, the initial setup gives users the options to:
Define test protocol sets
Identify what type of operator input is needed and when it is needed. Configure customizable operator prompts with warning messages and user instructions.
Specify data settings such as file names and paths so the data files are automatically stored and named to whatever you need **
Automates the data analysis of the data so once you start running test, you can walk away and come back to a full set of data and reports
The new batch testing tab includes the following functions and features:
Probe Control button to open the standard Probe Control window so you can manually move the probe up / down.
Calibrate Height button opens the standard probe height calibration wizard which helps you calibrate the probe position relative to the top of the table. This is extremely important when using the automation table as it is one of the safety features used to prevent the table moving if the probe is in a vulnerable position.
The middle section is the place to define the actual batch test information.
Batch Name is applied to each new test to distinguish it from other batch runs.
Append option to allow you to automatically append a number to the end of the batch name. This number is automatically incremented after each batch run to ensure each batch has a unique identifier. The drop list selects the minimum number of digits for the number, e.g. x will append 1, 2, 3…9, 10, 11, etc whereas 0x will append 01, 02, 03…09, 10, 11, etc.
Test Configuration button which opens the standard test configuration window so you can setup the test.
T.A. Settings button which opens the standard T.A. Settings window so you can define the test method used for each sample.
Number of Tests field (only available when the automation control option is set to None) is where you define how many tests the software will perform for each batch.
Test Positions (N) group (only available when the automation control option is set to A/LIS) defines the sample positions you wish to test.
All option tests all the defined positions.
From and To options define the first and last defined test positions.
Repeat option determines how many times each position will be tested. The positions are tested in turn and then repeated. A repeat of 3 will test 1, 2, 3, …, 1, 2, 3,…, 1, 2, 3,… If you want other options, you can use the A/LIS Setup to define the positions in a different order.
The lower section shows the current status of the system.
If the Start with Empty Graph Window box is checked then a new graph window is opened to take the new batch of tests if the active window already has data in it. This means that each batch will occupy a separate window.
The Start Testing button initiates the new batch run. This will run through the actions to collect the batch data.
Batch testing is available to all users of recent versions of Exponent (Version 6.1.0.0 and later users). To upgrade or for assistance in using the new batch testing functionality, please contact your regional manager or email us. For more information on the Automated Linear Indexing System, click here.